Showing posts with label Command Line. Show all posts

Thursday, November 26, 2009

Suppress rm No such file or directory

rm: cannot remove `*.html': No such file or directory


If you have a cron job that deletes files daily or on another schedule you probably don't want to get the email that tells you something like that. There's always the option of redirecting the output to /dev/null but then you're screwed if there's any other errors that you actually want to know about.

Instead, use the -f or --force flag of the rm program. That flag literally means ignore nonexistent files, never prompt. So instead of getting that cannot remove error, it will just go about business as usual.

Instead of the following to delete two types of files,
rm /path/to/*.html; rm /path/to/*.html.gz


Use the following to delete them and not have to worry if one type doesn't exist.
rm -f /path/to/*.html; rm -f /path/to/*.html.gz

Wednesday, September 16, 2009

Wordpress xargs: xgettext: No such file

I was getting the following error when trying to use the Wordpress i18n-tools to generate POT files for a Wordpress plugin.

xargs: xgettext: No such file or directory
Couldn't generate POT file!


At first it didn't make sense. I couldn't figure out why it wasn't finding my plugin directory or file. It hadn't donned on me that the file which couldn't be found was actually xgettext.
I'd assumed I already had gettext installed. I know it's installed on at least one of the machines around here.

In any event, took less than 5 minutes to fix by installing gettext.

sudo apt-get install gettext

Monday, August 17, 2009

Putty Ubuntu SSH Autologin

With the addition of a Windows Vista computer to my small network I find myself needing to get into the Ubuntu systems via SSH when I'm on the Vista computer. This is simple with Putty, but entering my username and password every time is annoying.

I've already setup the rest of the systems on my network to have Ubuntu login to SSH automatically. I don't see why I can't have the Windows Vista computer do the same with Putty.

Having already setup the other systems, I knew I needed a key to add to the authorized_keys file on the remote system, and by looking at Putty I knew I needed a private key file.

I tried using ssh-keygen on the Ubuntu system to generate keys, but the format used for the private key was different looking than the file format of the PPK file Putty was looking for.

In order to get the key pairs I needed a tiny utility called puttygen from the Putty downloads page.
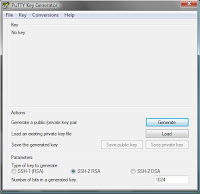

Here is what the interface looked like. I left everything default and clicked Generate.

After moving my mouse around to generate randomness while it generated a new pair of keys I clicked the Save Private Key button, selected yes when asked if I wanted to save the key without a passphrase, then selected the place I wanted to store the PPK file.

Next I copy and pasted the public key from the text area that showed up above the buttons and below where it says Public key for pasting into OpenSSH authorized_keys file, into my authorized_keys file on the remote system via nano in an open SSH session.

After closing Puttygen I closed my existing SSH session out and re-opened Putty to be presented with the settings dialog.
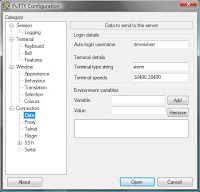

I entered my username in the Connection -> Data -> Autologin Username field as shown here.

Then I selected the PPK file I saved earlier in the Connection -> SSH -> Auth screen.

Viola! Autologin to Ubuntu via SSH using Putty worked like a charm.

Wednesday, May 13, 2009

Ubuntu SSH Autologin

Are you looking for Putty Ubuntu SSH Autologin ?


I've got a small network of Ubuntu computers at home and only one has a monitor. The rest I manage with SSH, FTP, and XDMCP logins.

Entering my password every time I want to get a terminal for one of the remote systems isn't very fun because my passwords are upwards of 16 characters. So I needed a way to login with SSH without needing to type a password.

On my main system, the one with the monitor, I used ssh-keygen at the terminal to generate a pair of public and private keys. By default ssh-keygen wants to create key files named id_rsa and id_rsa.pub but I decided to use home-network for my key files instead so I know what these ones are for.

I also just pressed enter for the passwords to leave them blank.

user@main-computer:~/Desktop$ ssh-keygen
Generating public/private rsa key pair.
Enter file in which to save the key (/home/user/.ssh/id_rsa): /home/user/.ssh/home-network
Enter passphrase (empty for no passphrase):
Enter same passphrase again:
Your identification has been saved in /home/user/.ssh/home-network.
Your public key has been saved in /home/user/.ssh/home-network.pub.
The key fingerprint is:
00:00:00:00:00:00:00:00:00:00:00:00:00:00:00:00 user@main-computer
The key's randomart image is:
+--[ RSA 2048]----+
| |
+-----------------+
user@main-computer:~/Desktop$


Once that was done I opened my FTP application and navigated the local and remote file lists to the following directory.

/home/user/.ssh/


I uploaded home-network.pub to the remote system and renamed it to authorized_keys so that on the remote system I had the following.

/home/user/.ssh/authorized_keys


If that file already existed on the remote system, I would have opened both files in my text editor and copied the contents of the *.pub file into that authorized_keys file.

Once everything was saved and uploaded I fired up SSH to login to the remote system and was logged in without needing to enter my password.

Friday, January 25, 2008

sudo: /etc/sudoers is owned by

Right about now you're probably looking at somthing similar to this.
sudo: /etc/sudoers is owned by gid 1000, should be 0


Maybe you accidently chown'd or chmod'd files recursively where the etc directory was effected. Maybe you did the same thing I did & chowned /etc/sudoers to root:mygroup instead of root:root like it's supposed to be.

In any event you're looking at a message like the one above and you can't use sudo anymore. This is because the sudo application wants things exactly right or it assumes there's been a compromise.
The file /etc/sudoers should be owned by root:root and should not be readable by anyone other than root.

Unless for some reason you allow remote root logins, you will need to physically have the server in front of you to fix this issue. If you don't have a monitor hooked up to the system, you better find a monitor to hookup now.

If you have the root password, login as root & chown the file to root:root.
root@box:~$ chown root:root /etc/sudoers

Then chmod the /etc/sudoers to 0440.
root@box:~$ chmod 0440 /etc/sudoers


If you, like I, never set a root password, you'll need to reboot the system, press ESC during boot, & select the recovery mode from the boot options. That will give you a terminal logged in as root you can use to run the chown and chmod commands.

Once the proper ownership & permissions are set on that file you can restart the system as usual & sudo should be up and running again.